Setting Up Proxy Connection for Client PC
This is how to setup and/or convert a client PC from our original proxy installation, to our new design. But first a little background history :
Our original connection method here in the office used Microsoft Proxy Server 2.0 on our NT server, edumetNT. This was "cascaded" behind the Comcast proxy machine which was also running Microsoft Proxy Server 2.0. (Cascade means that it just passes requests from the child to the parent or from edumetNT to ccproxy).
The problem with this scenario, was that it only works well in an environment where you do ALL Microsoft work. The reason for this is, unknown to the user, Microsoft went and replaced your PC's "winsock.dll" with its "proxy aware" winsock, and then routes ALL TCP/IP traffic over that "proxy aware" winsock.
When we tried to dial into Union County using PPP (which uses the modem as a virtual network interface), all TCP/IP traffic was still going out over the local network interface card (network card - not modem) using the "proxy aware" winsock. This would effectively eliminate us from ever using any other method of connection, other than the local network card. This was a problem, so we have now disabled Microsoft's Proxy Server 2.0 on the server, and disabled the Microsoft Proxy Client on all of the PC's. By disabling the PC's Microsoft Proxy Client, we actually restore the original winsock.dll file, and can now use the PPP again.
The new problem, is that in this process, we lost our Internet connection, as far as the client PC's are concerned. To get around that problem, we installed WinProxy, by Ositis, on the edumet NT server. This effectively replaces the Microsoft Proxy Server with another product. This also cascades with the Comcast proxy server, but it sees all of our clients differently.
An example of that difference is that before, we used to put the true mail server's IP address on a PC, in the mail configuration area. Now we actually put the edumetNT's address (the WinProxy machine) instead, and the edumetNT is intelligent, meaning it knows what to do with that information. It forwards it through Comcast's machine.
Before we had smart clients, and a dumb server. Now we have dumb clients and a smart server, and the performance is much greater, because the server was built in advance to handle the traffic and load, and we are finally leveraging that cost investment.
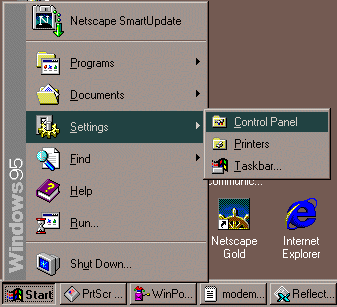
The first step is to disable the Microsoft Proxy Client on the PC. So begin by clicking on the "Start" button on the taskbar (normally located in the lower left of the screen - unless you have moved the taskbar), and choosing "Settings". This will bring up a sub menu, from which you will choose the "Control Panel". I have shown, and described this for a Windows 95 machine, which will be similar for a Windows 98 machine. For NT however, you will need to be the "Administrator" to perform this level of change. This is a system level change, not a user level change, hence the need to be "Administrator". So your screen should look similar to the one below.

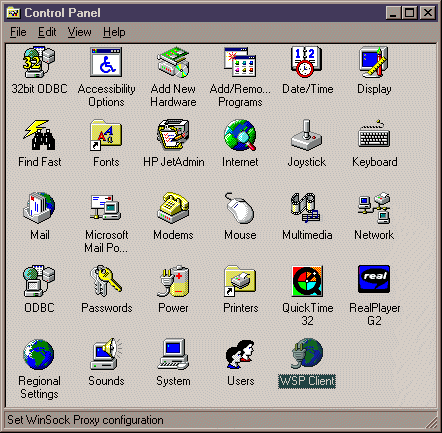
Once the "Control Panel" is up on the screen, it should look similar to the screen below. Select the "WSP Client". Note that you may have more or less "applets" in your specific "Control Panel".
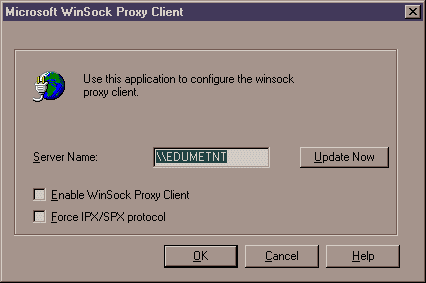
After launching the "WSP Client", you should have a screen looking similar to the one below. The important step here is the make sure that the checkbox for "Enable WinSock Proxy Client" is disabled. Once it is disabled, you will be prompted to restart the machine. Choose "NO" for the restart option. There is a bug in the "restart code" on the machine, so you will have to do it manually.
Custom Section for Internet Explorer 4.0 and later :
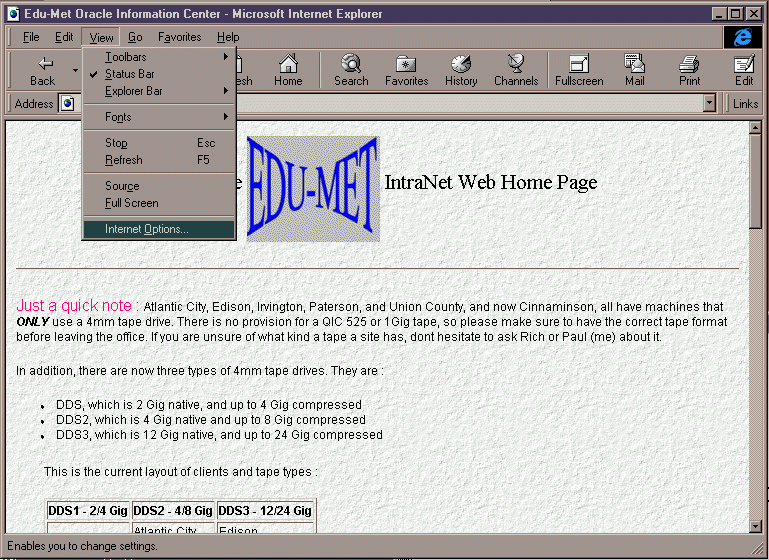
Begin by launching Internet Explorer, and letting the home page "time out" if need be. Then select "View" from the menu bar at the top of the application window, and then "Internet Options" from within that sub menu. Your screen should look similar to the one shown below.
Once you have done that, a window similar to the one shown below should appear. This is the "Internet Options" window that allows all changes for the runtime environment to be made. Select the "Connection" tab at the top of the window, and setup the middle section of the screen, the "Proxy Server" settings. The address line should read "http://edumetnt" and the Port should read : "8080". You may or may not have selected the "Bypass proxy server for local addresses" It doesnt matter.
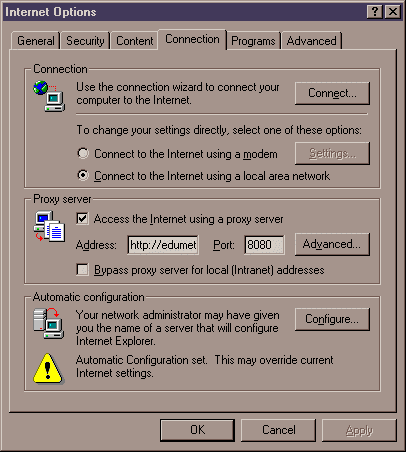
Then click "OK" and that will complete the update. You can then try it out, by searching for a web site from the main page area.
Custom Section for Netscape 2.0 - 3.0
Begin by launching Netscape, and I am assuming it is a pre 4.0 version. If it 4.0 or later, read on to next section, where that is covered. Let the home page "time out" if need be. Then select "Options" from the menu bar at the top of the application window, and then "Network Preferences" from within that sub menu. Your screen should look similar to the one shown below.
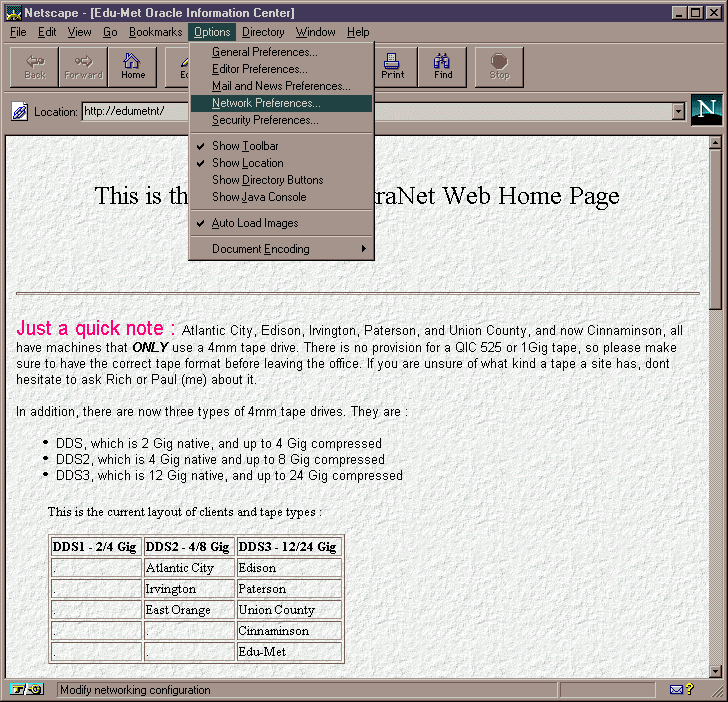
This will bring up another window, that should look like the one below. Click on the "Proxies" tab at the top of the screen. From there, you want to click on the "Manual Proxy Configuration" radio button, and then click the "View" button.
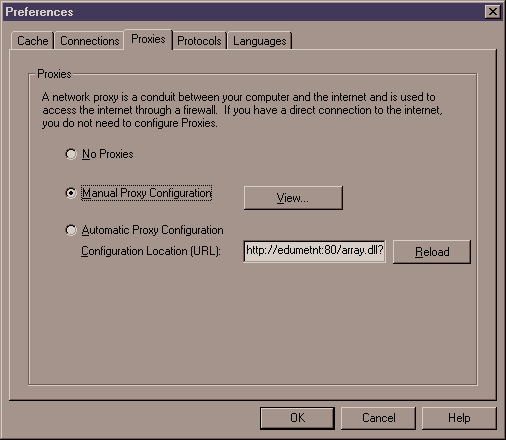
The "View" button, will actually allow you to make changes to your current settings. Unlike Internet Explorer, you cant check a button to make all of the protocols the same, so you will have to key in each one individually. The only ones we need entered are : "FTP Proxy", "HTTP Proxy", and "Security Proxy". By no means should you even consider touching the "SOCKS Host" area. Click "OK" when finished.
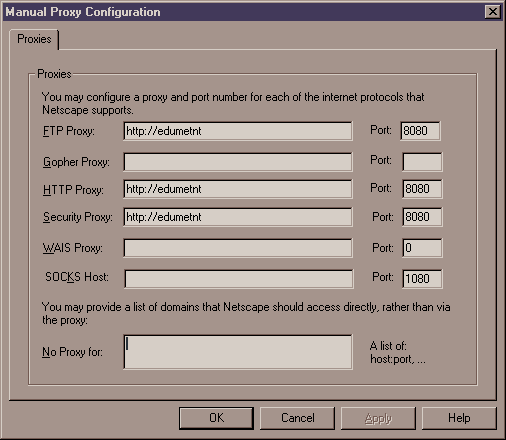
Then click "OK" and that will complete the update. You can then try it out, by searching for a web site from the main page area.
Custom Section for Netscape 4.0 and later
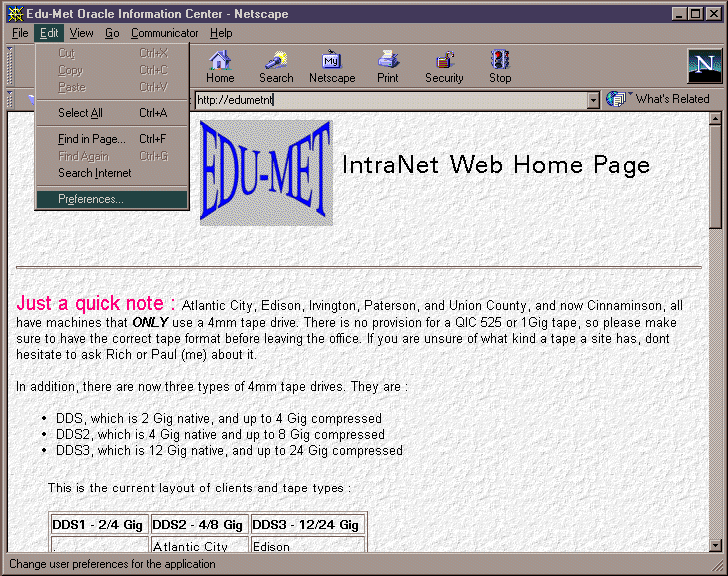
Begin by launching Netscape, and I am assuming it is 4.0 version or newer. If it is earlier than 4.0, read the previous section, where that is covered. Let the home page "time out" if need be. Then select "Edit" from the menu bar at the top of the application window, and then "Preferences" from within that sub menu. Your screen should look similar to the one shown below.
From the "Preferences" box, as shown below, expand the "Advanced" category. Click on the "Proxies" entry that has now appeared, and you will see the Proxies section appear on the right side of the window. From there you need to select "Manual proxy configuration" radio button, and the click on the "View" button.
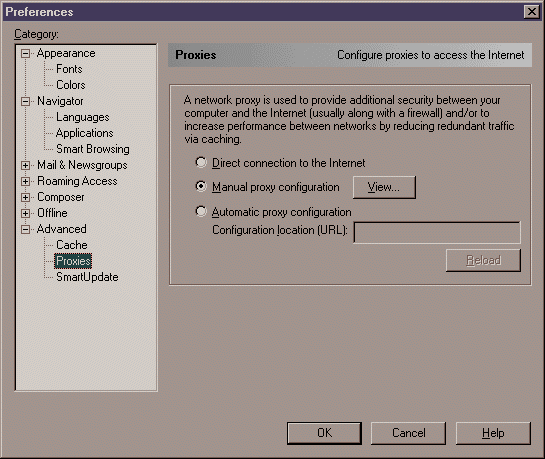
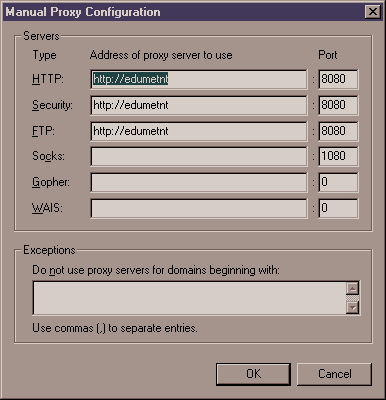
That will bring up the screen which will actually allow the changes/entries
for the proxy address and ports. Enter the "Address of proxy
server to use" as "http://edumetnt" and the "Port"
should read : "8080". You may or may not have selected the "Bypass
proxy server for local addresses" , it doesnt matter.
Then click "OK" and that will complete the update. You can
then try it out, by searching for a web site from the main page area.
This page last updated 02/16/1999.